Swedish Weaving is also known as Huck Embroidery. This needle art became popular in the late 1940's. Homemakers decorated the borders of Huck towels with embroidery floss. Today, crafters make couch throws, baby blankets, pillows, wall hangings, pictures, and table linens using yarn and monk's cloth. They also enjoy using a variety of threads on other even-weave fabrics, such as Huck cloth, Huck toweling, and Aida cloth.
Materials
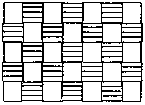
Monk's cloth - Monk's cloth is 100% cotton with 4 floats per inch (8 rows per inch). It has a loose over and under four strand weave. Monk's cloth is found at craft and fabric stores. They sell it by the yard from a bolt. Purchase 2 1/2 yards for a couch throw.Before stitching, prepare the fabric by zig-zagging the raw edges. Then wash with detergent in warm water. Dry in the dryer. It might shrink anywhere from 48 inches to 52 inches wide.
Monk's cloth comes in white, natural, red, pink, blue,
green, and black. Dye the
fabric for other colors.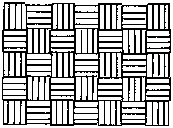
Needle - Use a #13 yarn needle. This dull needle has a big enough eye to easily thread, but not so large it pulls the floats out of shape.
Yarn - Choose a high quality yarn that will not shrink, pill or bleed. Four-ply yarn works the best. Avoid yarns that require special handling or washing. Most blankets use between eight and sixteen ounces of yarn, depending on the design.
Safety pins - Use pins to mark the center point and design starting points.
Huck toweling - This material is 15" wide and has 7 floats per inch. The floats only run in one direction, vertical on the front and horizontal on the back.
Huck cloth - This material has 3 floats per inch (6 rows per inch). Stockholm and Popcorn are two brand names. Stitch designs with Perle Cotton.
Aida cloth - This fabric is labeled as to the size of the weave. A 14-count fabric, means 14 rows per inch. Stitch designs with embroidery floss. When stitching pick up the two center threads instead of going through the holes as for counted cross stitch.
Fabric Preparation
Before stitching, it is necessary to prepare the monk's cloth. This cotton fabric will shrink and the raw edges will unravel when washed. To prepare the monk's cloth for stitching, first zig-zag all raw edges. Then wash with detergent in warm water. Dry in the dryer.
Terms
Raw edge - The cut edge which must be zig-zagged before washing.
Selvage edge - The finished edge of the fabric.
Float - The four strands of thread
that run vertically along the fabric.
Horizontal Float - The four
strands of thread that run horizontally in the fabric.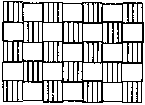
Split Float - Also known as half float. Only 2 strands of the four threads are picked up and stitched.
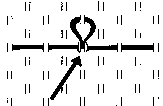
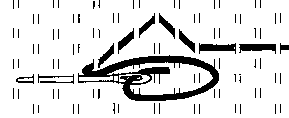
Row - The vertical and horizontal threads (boxes) which run either from top to bottom or side to side. In the pattern instructions, left 1 and up 3, means you count left one row and up three rows.
This term is also used to mean one part of a design.
Even-Weave - Any stitching medium with evenly spaced rows, such as the following: Monk's cloth, Huck toweling, Huck cloth, and Aida cloth. We have also used these other mediums: Linen, dish towels, floor mats, afghan material, and hand crocheted afghans.
Stitching Techniques
Start from the center of the fabric and work design to the edge. To find the center of the fabric, fold the cloth in half vertically and then in half horizontally. Place a safety pin in the center float to mark the center of the fabric.
Measure the yarn from edge to edge of the fabric, the number of times given in the pattern and then add eight inches. Thread needle and make the first stitch by catching the four vertical strands of the float. You cannot see the yarn on the backside of the fabric, since the yarn lies on the top of the threads below the float. Glide the yarn through this first stitch. Position half of the yarn on each side of this stitch.
Start in the center of each row and work to the edges. Remove the needle. Then turn the fabric upside down. Rethread the needle with the other half of the yarn and work to the edge. Starting in the center is beneficial in two ways, one, there is not as much yarn to control and two, the yarn does not become overworked.
Folding the fabric near the stitching row makes the area easier to reach. Holding your thumb over the first stitch helps the yarn glide through easily and keeps the yarn from pulling the float out of shape.
To correct mistakes, carefully work backwards through the floats.
In most pieces, work the design to the end of the row, whatever the edging used. After the last stitch at the end of the row, push the needle through to back of the monk's cloth. Then remove yarn from the needle leaving the yarn on the back side. If only part of the design will be completed at the end of the row, select a pleasing stopping point. Then finish with base stitches to the end of the row.
In designs that do not end at the edge of the fabric, run the needle back through a few floats on the front of the piece. Push the needle to the back of the piece and clip the yarn and secure with fabric glue. If the work is a pillow or wall hanging, push the needle through to back of the monk's cloth. Run the needle through a few floats on the back of the piece, and then clip the yarn.
Edging
Blankets, pillows, table cloths, and other projects can have a variety of finished edges.
Fringed Edges
Zig zag 4 - 36 rows from the edge. Cut the edge of the monk's cloth even on all four sides. Unravel the rows from the zig zag stitches to the edge of the cloth. Cut off all the yarns at the edge of the cloth to be the same length as the fringe.
A pillow may also have this edging. Iron the pillow top on the back side. Zig-zag 4 to 20 rows from the four edges. Cut the edges even. To fringe, remove the outer strands of monk's cloth. Cut the material for the pillow back the same size as the pillow top. Fold over the edges and press. Place the fabrics with the wrong sides together. Using a straight stitch, sew around three edges and the four corners. Insert a pillow form. Sew the fourth side.
Variation 1 - Instead of cutting the edge of the monk's cloth in a straight line, cut the edge in a zig zag or a scallop pattern.
Variation 2 - Cut yarns longer than edge of monk's cloth.
Variation 3 - Tie two sets of the fringe together in a square knot or tie one set in an overhand knot.
Variation 4 - This is elegant especially with long threads. Twist one set of threads to the right until very tight. Repeat with another set. Hold both together at the end and twist to the left. Tie an overhand knot at the end to secure.
Sewn Edges
Zig zag the raw edges. Fold over all the edges and stitch in place.
Fringed and Sewn Edges
Fringe the raw edges. Fold over the selvage edges and sew. This is the usual method for couch throws.
Bound Edges
Zig zag the raw edges. Attach seam binding to all edges around the item.
Crochet Edges
Zig zag the raw edges. Crochet a single crochet around all edges or crochet a shell stitch pattern around all edges. Shell stitch (5 double crochet, skip two, single crochet, skip two) repeat around edges putting 7 double crochet in the corners.
Lace Edging
Zig zag the raw edges. Top stitch clunky lace or decorative trim around the item. Miter the corners, as necessary.
Piped Edging
A pillow may have a piped edging sewn between the front and back layers of the pillow before turning. For a table runner, turn under the edges and sew on piping.
Tassels
Tassels add a special finishing touch to a wall hanging, to the corners of pillow or at the end of a table runner. Purchase tassels or make from the unraveled monk's cloth threads or matching yarn.
Design
Add variety to make your piece of handiwork interesting. Combine rows of different heights. Work the shapes together to fit.
Combine design elements from one piece with design elements from other pieces by changing the number of stitches to match up designs.
Create interesting pieces by using one design element from a pattern and repeating it throughout the piece.
Since blankets are often displayed folded, it is a time saver to only stitch borders at the end of blankets and stitch a grid in the middle of the blanket.
Color
Choosing the right colors can make your project a success. If in doubt about which colors might go together, look at the skein of variegated yarn and pick out a two or three colors found in the skein. It is helpful to check out the fabric section to see which color combinations are appealing. Also, look at the colors of the draperies, furniture, pictures, etc. where your piece will be on display.
White on white or off-white on off-white. The piece will seem rich.
Monochromatic - Chose several yarns in the same family.
Examples:
1. Light Blue, Medium Windsor Blue, Dark Windsor Blue
2. Light Pink, Medium Coral, Dark Coral
3. Buff, Light Brown, Medium Brown, Dark Brown
4. Light Sage, Medium Sage, Dark Sage, Hunter Green
Other color combinations
1. Light plum, dark plum, hunter green, and buff
2. Variegated pastel yarn stitched with a matching light yellow and light blue.
3. Light, medium, and dark spruces with roses